710 views
この記事は最終更新から 849日 が経過しています。
1. やりたいこと
画面上の非矩形な領域をマウスホバーした時に、何らかの反応をさせたい。
2. やってみる
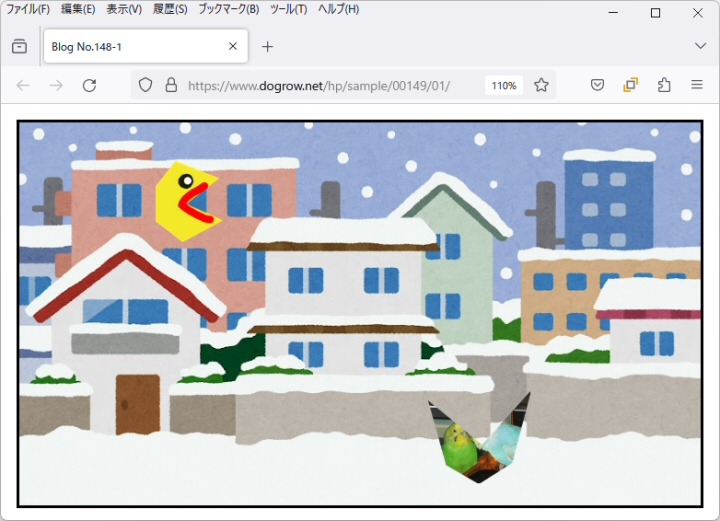
方法1 : ベクタ画像データを使う
下記コードの実装例はこちら。
https://www.dogrow.net/hp/sample/00149/01/
(1) index.html
<!DOCTYPE html>
<html>
<head>
  <title>Blog No.148-1</title>
  <link rel="stylesheet" href="style.css" />
  <script src="script.js"></script>
</head>
<body>
  <div class="imgArea">
    <img id="imgBg" src="./bg_snow_jutaku.jpg" alt="" />
    <object id="item1" class="fimg" type="image/svg+xml" data="./myimg_1.svg" data-pup="pup1"></object>
    <div id="pup1" class="pup">パックマン?</div>
    <object id="item2" class="fimg" type="image/svg+xml" data="./myimg_2.svg" data-pup="pup2"></object>
    <div id="pup2" class="pup">セキセイインコたち</div>
  </div>
</body>
</html>
(2) script.js
document.addEventListener("DOMContentLoaded", function() {
  var elem_fimgs = document.querySelectorAll('object.fimg');

  elem_fimgs.forEach(function(elem) {

    elem.addEventListener('load', function() {
      const svgDoc  = this.contentDocument;
      const svgElem = svgDoc.querySelector('polygon');
      const pup_id  = elem.getAttribute('data-pup');
      const pupElem = document.getElementById(pup_id);
      if(svgElem && pupElem){

        svgElem.addEventListener('mouseover', function(ev) {
          svgElem.style.cursor = 'pointer';
          elem.classList.add('anim_blink');
        });

        svgElem.addEventListener('mouseout', function(ev) {
          svgElem.style.cursor = '';
          elem.classList.remove('anim_blink');
          pupElem.style.display = 'none';
        });

        svgElem.addEventListener('click', function(ev) {
          pupElem.style.display = 'inline-block';
        });
      }
    });
  });
});
(3) SVG画像
Adobe Illustratorで編集、出力した SVG画像をそのまま使った。
<?xml version="1.0" encoding="UTF-8"?>
<svg id="_レイヤー_2" data-name="レイヤー 2" xmlns="http://www.w3.org/2000/svg" xmlns:xlink="http://www.w3.org/1999/xlink" viewBox="0 0 167.23 201.14">
  <defs>
    <style>
      .cls-1 {
        fill: #3072b9;
        stroke-width: 0px;
      }
    </style>
  </defs>
  <g id="_レイヤー_1-2" data-name="レイヤー 1">
    <image width="720" height="866" transform="scale(.23)" xlink:href="myimg_1.png"/>
    <polygon class="cls-1" style="opacity:0" points="48.7 0 0 63.24 0 149.4 67.57 201.14 167.23 147.48 76.48 106.41 158.27 42.97 48.7 0"/>
  </g>
</svg>
(4) style.css
*{
  margin:  0;
  padding: 0;
  box-sizing: border-box;
}
div.imgArea{
  position: relative;
  margin: 1rem;
  border: 3px #000 solid;
  line-height: 0;
}
img#imgBg{
  width: 100%;
}
.anim_blink {
  animation: kf_blink 1s infinite;
}
@keyframes kf_blink {
  0%  { opacity: 1;   }
  50% { opacity: 0.1; }
  100%{ opacity: 1;   }
}
div.pup{
  position: absolute;
  background-color: #fffff8;
  box-shadow: 2px 2px 4px rgba(0,0,0,0.5);
  border-radius: 0.5rem;
  padding: 1rem;
  display: none;
}
#item1{
  position: absolute;
  top: 10%;
  left: 20%;
  width: 10%;
}
#pup1{
  top:  12%;
  left: 30%;
}
#item2{
  position: absolute;
  top: 70%;
  left: 60%;
  width: 15%;
}
#pup2{
  top:   72%;
  left:  75%;
}
方法2 : ラスタ画像データを使う
背景透過の PNG画像を使用する。
ポイントした座標の画素値を参照し、αチャネルの値が0であれば背景であると判断する。
ポイントした座標の画素値を参照し、αチャネルの値が非0であれば画像上と判断する。→ 反応させる。
↓↓↓
実際に実装して動かしてみたが…
・コード量が多く複雑になる。
・画素値参照による処理負荷が大きい。
よって…
今回は上述の「ベクタ画像データを使う」を採用することにした。
アクセス数(直近7日): ※試験運用中、BOT除外簡易実装済2026-06-22: 0回 2026-06-21: 3回 2026-06-20: 5回 2026-06-19: 0回 2026-06-18: 6回 2026-06-17: 2回 2026-06-16: 0回